Dazeydawl
-
Posts
1,029 -
Joined
-
Last visited
Content Type
Profiles
Forums
Gallery
Blogs
Store
Articles
Events
Reviews
Products
Everything posted by Dazeydawl
-

Where Would You Rather Be Right Now?
Dazeydawl replied to alexisinjamaica's topic in Random Thoughts
Haha LA being really cold, that makes me laugh a little. Well here in Winnipeg we are sitting at -32C with the wind chill factor bringing it down to about -40C so I would rather be pretty much anywhere. So aside from Jamaica for my wedding I'm going to go with my honeymoon spot. I'd rather be in Bali -

From the album: Where Would You Rather Be Right Now?
-
Where Would You Rather Be Right Now?
Images added to a gallery album owned by Dazeydawl in Pictures from (pre-2014) Forum Topics
-
-

From the album: Where Would You Rather Be Right Now?
-
How small is that bracelet. I love it but have tiny wrists bracelets are difficukt
-
I'm just waiting to hear back from my resort as to whether or not we are allowed to light these but I already have them in my cart from just artifacts
-
im not doing any specific program yet but thanks ill take a look
-
I just have a question. I do want to participate in the group but not sure if I want to contribute to the pot simply because I do t really have a lot of weight to lose, maybe 5 pounds. I just want the motivation to workout with everyone but I need to gain muscle and tone up so who know I may gain weight, so obviously the goal of losing the most lbs to win money doesn't really work for me
-
I'm somewhat on you fiancés side. But it really all depends you you guys and the type of peolple your guests are. All inclusives are great if you know everyone will be hanging around the hotel all the time. I'm the type when I travel i like to go on a lot of excursions and take in the culture. The one time I stayed at an AI I only ate there for breakfast and 3 other meals in a week, so in a way I kinda paid for food twice. Also most of my guests are the type who take annual vacations to AI so I wanted my wedding to be something more than just the yearly vacay. However if most of your guests never travel than AI mjght be the way to go.
-
absolutely LOVE your planning thread, such a great job on everything
-
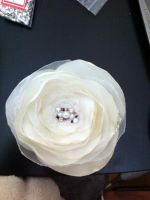
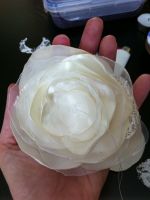
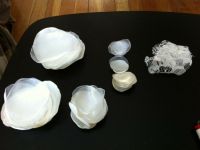
Finishing Up Once your finished with the beading knot the thread on the underside of the flower, if you want to make it into a brooch or hairclip just cut out a circle of felt and hot glue it to the back of the flower and add your backing hardware. I didnt do that with this flower as its going on either my ring bearer pillow or my flower girl basket. Both upcoming DIY projects.
-
From the album: DIY Tutorial - How to make your own fabric flowers!
-
DIY Tutorial - How to make your own fabric flowers!
Images added to a gallery album owned by Dazeydawl in Pictures from (pre-2014) Forum Topics
-
-
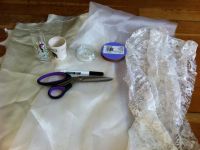
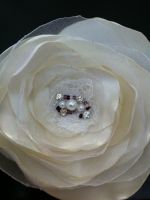
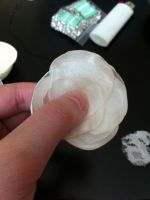
Step 5 I forgot to mention in the layering process that if you are using lace to just throw those pieces in randomly. But now that all the petals are layered its time to start on the center beading, this part can be tedious but you can also use larger beads than i have or just use a decorative button which will get it done super fast. However i use seed beads, pearls and sew on rhinestones. Before i start beading though i thread the need from the bottom up through the center only this time i add a small circle of lace to the center so that it hides all the stitch marks for sewing the layers together. And now that the thread is on the top i cut the thread right at the base of the needle and start stringing some beads. In order for the beads to be secure you can only do about 3 or 4 beads at a time and then you have to sew them down by then again threading the needle, however now i just put both ends of thread throught the needle. then push the needle through the flower where you finished with the beads and then push it back up as close to the same spot as possible, slide the needle off, slide on a couple more beads and just repeat the process until your happy with it.
-
From the album: DIY Tutorial - How to make your own fabric flowers!
-
From the album: DIY Tutorial - How to make your own fabric flowers!
-

From the album: DIY Tutorial - How to make your own fabric flowers!
-
From the album: DIY Tutorial - How to make your own fabric flowers!
-
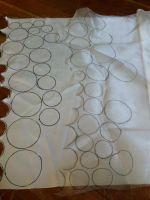
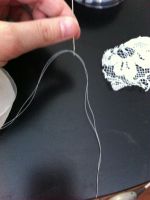
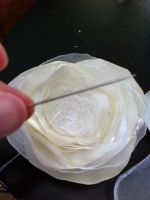
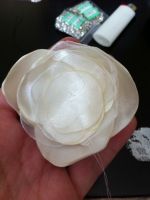
Step 4 Now to start layering the petals. Starting of course with the smallest circles. Theres really no rhyme or reason to the layering, just layer them in a way that you think looks pretty while keeping the flower somewhat symetrical. The great thing about flowers is they are not perfect therefore fabric flowers dont have to be either. Also get your needle and thread ready, use about 2 feet of thread (so it will be 1 foot once the needle is threaded) After i do each size of petal i like to secure it by sewing it just a little bit. So once i finished with the small circles, I took the needle and pushed it through starting from underneath, up through the center, then back down, then you have to push it back up through the center again so the needle and thread ends on the top so you can continue layering the next size of petal. After each size of petal you just repeat that process.
-
From the album: DIY Tutorial - How to make your own fabric flowers!
-
From the album: DIY Tutorial - How to make your own fabric flowers!
-
From the album: DIY Tutorial - How to make your own fabric flowers!
-
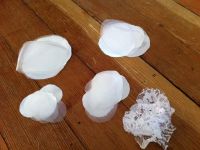
Step 3 Light the candle. It is now time to start burning the edges. Holding one circle at a time, hold the edge to the flame and turn the circle so that the cut edge melts. As the edge melts theI circle will start to pucker and form a petal shape. I like to do it fairly fast and go around the edge a couple times until its the shape and stiffness i like. Its hard to explain but you'll know what im talking about when you try. Make sure when you are doing the satin circles that the shiny side is facing up as that is the direction that it will pucker. Its really hard to get a good picture of this process All the petals, you can see how they all curved.
-
From the album: DIY Tutorial - How to make your own fabric flowers!
-

From the album: DIY Tutorial - How to make your own fabric flowers!