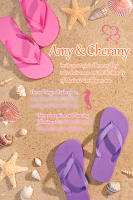
cherany
-
Posts
327 -
Joined
-
Last visited
Never
Content Type
Profiles
Forums
Gallery
Blogs
Store
Articles
Events
Reviews
Products
Everything posted by cherany
-
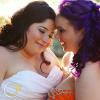
From the album: Post your bouquet and inspiration pics here
-
 Oh, I like the idea of blindfolds! We are also doing First Look photos. I don't know where to find what you're looking for, but I'd love to hear from brides who did this - did the blindfold affect your hair and make-up? I think I'd be too afraid to mess things up!
 -
We asked our venue if they were allowed, thinking we would buy them and bring them down, but they offered them for less than $14/each, which I feel is the better way to go. I'm already worried about how much luggage we're going to have, so I'm happy to pack one less thing. They told us we need 3 people per lantern, and they do look pretty big. They sent photos, although we're going to have solid colors instead of the multi.
-
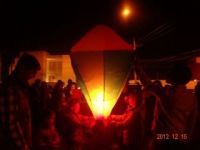
From the album: Sky Lanterns!
-
Sky Lanterns!
Images added to a gallery album owned by cherany in Pictures from (pre-2014) Forum Topics
-
-

From the album: Sky Lanterns!
-
Finished my invites this week & mailed out the long distance ones. We're hand delivering the local ones to save $. Really proud of the design: http://www.bestdestinationwedding.com/forum/newestpost/84758
-
Quote: Originally Posted by KCDawn Wow!!! These are gorgeous! SOOO professional looking. I love the luggage tag tucked inside the card design. Can't wait to see more! Thank you so much! I just posted my invitations here: http://www.bestdestinationwedding.com/t/84758/diy-message-in-a-bottle-invitations-with-passport-boarding-pass-more
-
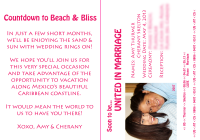
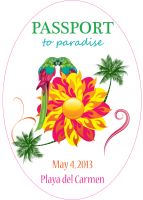
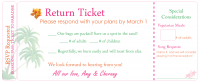
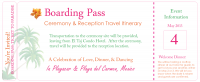
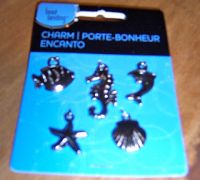
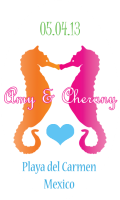
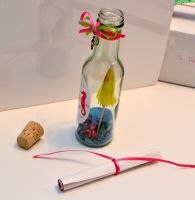
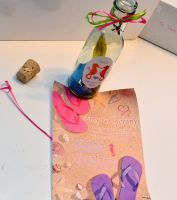
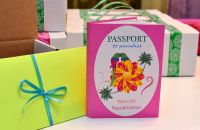
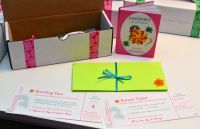
With just 22 invites going out (half of those hand delivered), we had the luxury of being able to spend more per person and decided to go with the Message In a Bottle idea. However, with all the super cute choices out there, I found myself wanting to incorporate other things, too. In the end, I came up with a way to use all my favorite ideas: luggage tag, message in a bottle, passport, boarding pass, & suitcase! Our STDs were luggage tag magnets, which I shared here: http://www.bestdestinationwedding.com/t/79805/my-diy-save-the-dates-luggage-tag-magnet-design/ We gave those out a year in advance (couple months later for the ones I had to mail; I'm a procrastinator), with perhaps too long of a gap between them and the actual invitations, although I didn't intend it that way. I never dreamed the invitations would take as long as they did! The design was very time consuming, since I'm only comfortable in Photoshop (really the worst program for stuff like this, comparable to making a scrapbook from scratch with no templates). I just finished them this week and mailed out the long distance ones. The local ones, we're hand delivering asap. Photographing the contents inside the bottle was difficult, but each bottle has blue sand, opalescent blue glass chips, pearly multi-colored shells, paper umbrella (various colors), and the invitation rolled up and tied with a ribbon sticking out of the cork. On the outside, I added the printed sticker, ribbon, and a charm. Forgot to take my own pic, but found this image on the web; same charms we used (got them at Michael's). Paper umbrellas from Party City, colorful shells from Joanne, glass chips from Michael's. (Blue sand also from Michael's, found beside a rainbow of colors on the kids' craft aisle, not where the shells, starfish, and natural sand colors were. We got our bottles from this site: http://www.bottlemeamessage.com/index.php - very pleased with them!) Sticker designed in photoshop - let me know if you would like the .psd file, which can be pasted onto oval sticker templates (that's what we did). I was lucky to find an image in Word for the actual invitations, since all the other graphic design aspects of this project were done the hard way by scouring the web for vector images (not easy - if anyone is looking for beach related vectors files, I now have several, many not shown here; let me know if you would like them, and I'll e-mail the files), then arranged into designs in Photoshop (super time consuming, can only recommend to complete control freaks/picky designers). Box contains the bottle, card sleeve, and a passport booklet. Inside the green sleeve is a Boarding Pass with event info & a Return Ticket for the RSVP card, which we put our address & a stamp on the back of, so people can mail it back like a postcard. The sleeve is just a piece of cardstock tri-folded and tied with a ribbon. Again, I used Photoshop to design these one element at a time, rather than from a template, but I can share the .psd layered files if anyone else is creating their designs with Photoshop. Just let me know you want them, and I'll send. The passport was created by cutting and folding a pink cover from cardstock and gluing in individual pages. I was absent minded and did not print on both sides of the pages, so I had to glue each page to the next, but that turned out to be a good thing, because it gave me a booklet to paste inside the pink cover as one piece. I didn't take any pictures of the process, but if I'm not making sense, feel free to ask questions. I designed the passport to be the same size as an actual passport, although I forget the exact dimensions (easy to google). Sticker designed in Photoshop; let me know if you'd like the layered .psd file (everything you see is a separate element, and I have vector files for the images, if anyone wants those). Photoshop designs of each page: Again, I have layered photoshop files of each page, if anyone wants them. I added a border before printing, but they're otherwise exactly as I printed them. This project taught me I really, really need to learn how to use some easier publishing programs! Maybe one day when I'm not so busy (like, after the wedding), I'll create some Word or Publisher files of these things to share here. Contents all boxed up! I meant them all to look the same, but I seriously underestimated how much ribbon I needed and had to make due with what the store had left when I ran out of pink mid-project. Ended up using green for our local friends (hand delivering those to save $) and pink for the long distance ones. Trying not to let it bother me! The ribbon is from Michael's and the boxes were purchased with our bottles (link provided under bottle pics). I made the ribbon handle stiffer by gluing cardstock to the underside of it. Not sure how well they're going to hold up in the mail, but fingers crossed they still look like suitcases when they arrive in friends' mailboxes! The finished product ended up weighing 12-13 ounces and was just under $4 to mail within the US. One went to Canada for about $11 and two went further to the U.K. & Australia for nearly $17 each! Even still, I only spent about $75 mailing, since we have so many to hand deliver, so I wasn't too bothered by the International ones costing a fortune. I'm super excited to give these to friends! Really proud of myself, but definitely glad to be done! I lost track of the number of hours I worked on them (weeks!) and also of the cost (surely more than I'd like to know, so I'm happy to remain ignorant about it), but I do think they were worth all the effort. I saved one to keep and will hopefully remember to bring it to Mexico to include in our pro photos.
-
-
DIY Message In a Bottle Invitations (with passport, boarding pass, & more)
Images added to a gallery album owned by cherany in Pictures from (pre-2014) Forum Topics
-
-
-
-
-
-
-
-
-
-
-
-
-
-
-